Difference between revisions of "SEQTool"
From SCI Wiki
Jump to navigationJump to search (→Usage) |
(→Usage) |
||
| Line 59: | Line 59: | ||
# Register the tool by clicking "Tools" > "Options" and click which type you want to make SEQTool the default program to open that type. | # Register the tool by clicking "Tools" > "Options" and click which type you want to make SEQTool the default program to open that type. | ||
# Open any SEQ file you wish to view or edit by clicking the Open SEQ button on the toolbar above the player window. If you have registered SEQ files with the SEQTool you can also double click the SEQ file in Windows Explorer to open it in the player. | # Open any SEQ file you wish to view or edit by clicking the Open SEQ button on the toolbar above the player window. If you have registered SEQ files with the SEQTool you can also double click the SEQ file in Windows Explorer to open it in the player. | ||
| − | + | ## Click the play button to view the SEQ file. | |
| − | + | ## Click the "Edit SEQ" button to extract all frames into a "SEQ_SRC" subdirectory under your SCI Companion project's folder. The images can now be edited or rearranged as wished. | |
# Add images by clicking the "Add" button or dragging & dropping the desired images into the list or thumbnail panel below. Note that these images must be 320px x 200px and no more than 8-bit color paletted. | # Add images by clicking the "Add" button or dragging & dropping the desired images into the list or thumbnail panel below. Note that these images must be 320px x 200px and no more than 8-bit color paletted. | ||
# Import an animated GIF (320px x 200px) by clicking the Import menu item or button to browse to and selecting the desired GIF file. | # Import an animated GIF (320px x 200px) by clicking the Import menu item or button to browse to and selecting the desired GIF file. | ||
Revision as of 12:40, 30 March 2016
| Latest Version: | 1.0.0.0 | ||
|---|---|---|---|
| Release Date: | Mar. 30 2016 | ||
| Company: | {{{Company}}} | ||
| Publication Status: | {{{Published}}} | ||
| Developer(s): | Template:Andrew Branscom | ||
| Language: | C# | ||
| Open Source: | {{{OpenSource}}} | ||
| Source Available: | {{{Source}}} | ||
| License: | {{{License}}} | ||
| Platform: | Template:WindowsTool | ||
| Type: | Plugin | ||
| Localization: | English | ||
| Website: | |||
Description
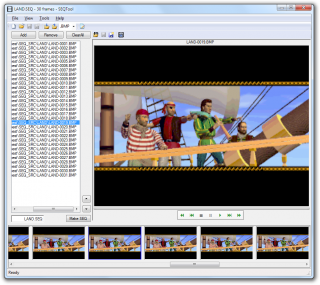
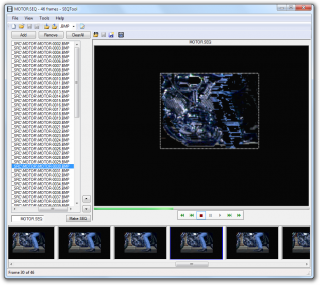
SEQTool 1.0.0.0 is based on Kawa's command line SeqMaker tool and uses his KawaTools class. SEQTool is a plugin for SCI Companion for creating, editing and viewing of SCI SEQ (cut scene) resources. It can be opened directly from SCI Companion, using your Companion project as for your SEQ project.
SEQ resources were used for cut scenes in the Sierra SCI1.1 games. It is also a viewer that can be used to play existing SEQ files, including those from the official Sierra games like King's Quest 6 and Gabriel Knight 1.
Screenshots

|

|
Features
- Add frames in order of the sequence in the list to order them as needed. Selecting an image in the list will display it in the player display to the right.
- Add images with the "Add" button or dropping them into the list.
- Supports other image formats like BMP, GIF, PCX, TIF and PNG*
- Edit existing SEQ files after opening the SEQ file
- Importation of animated 320px x 200px GIFs
- Export SEQ to series of BMP/GIF/PCX/TIF/PNG files
- Can automatically add a "movieDir=" entry in the CFG file.
- A panel at the bottom displays a thumbnail for each image. These are always synced to the same order as the list.
- Drag & drop functionality so images cam be added or to rearrange frame order in either the list or thumbnails. If the list is reordered or if an image is removed or a new image is added, the order of the thumbnails will reflect the change. Gives an at-a-glance view of the frame order.
- The "Use SEQ Subdirectory" checkbox will let the user set the output to a subdirectory named 'SEQ' under the project's folder. Deselecting it will set the output to the project's base folder.
- Edit any image on the fly by right clicking on an item in the list or its corresponding thumbnail and selecting "Edit".
- Once there are at least 2 frames loaded and a SEQ name entered you can create your new SEQ. It will automatically load it in the player. To view it, just click the "Play" button.
- A save project system with prompt. Can associate the tool's save file extension (*.sqp) so a saved project can be loaded by double clicking the save file.
- The SEQTool can associate SEQ files with so that double clicking on a SEQ file will automatically play the file in the built-in player.
- Checking "View" > "Examination Mode" will show pixel changes between frames during play of loaded SEQ file.
* Note: JPG is disallowed because its 'lossy' format introduces artifacting
Usage
- Copy to a subfolder under SCI Companion's "Plugin" subfolder.
- After creating/opening a project in SCI Companion, click on the SEQTool item in SCI Companion's "Plugins" menu.
- Register the tool by clicking "Tools" > "Options" and click which type you want to make SEQTool the default program to open that type.
- Open any SEQ file you wish to view or edit by clicking the Open SEQ button on the toolbar above the player window. If you have registered SEQ files with the SEQTool you can also double click the SEQ file in Windows Explorer to open it in the player.
- Click the play button to view the SEQ file.
- Click the "Edit SEQ" button to extract all frames into a "SEQ_SRC" subdirectory under your SCI Companion project's folder. The images can now be edited or rearranged as wished.
- Add images by clicking the "Add" button or dragging & dropping the desired images into the list or thumbnail panel below. Note that these images must be 320px x 200px and no more than 8-bit color paletted.
- Import an animated GIF (320px x 200px) by clicking the Import menu item or button to browse to and selecting the desired GIF file.
- Export any opened SEQ file to individual image files by clicking the Export menu item or button to browse to the desired output folder.
- Remove any frames by selecting the image and clicking the "Remove" button or the context menu.
- "Clear All" will remove all frames in the list.
- Select frames in the list or its thumbnail to view the image in the player. Double clicking the frame in the list or its thumbnail will open the image in your default viewer.
- Step through the images frame by frame with the cursor keys or the navigation buttons in the player control.
- Edit any image by right clicking on the image and selecting "Edit". This will open the image in your default image editor.
- Order as needed by dragging & dropping in the list or thumbnails.
- Save your current SEQ project by clicking the "Save" menu item or button. You can reopen the project by clicking the "Open" menu item or button and selecting the save file. If you have registered SEQTool for SEQTool project files you can also double click the save file to reopen your SEQTool project.
- Once the frame list has been populated and a name for the SEQ file (DOS 8.3 naming convention) the "Make SEQ" button will be enabled. Clicking this will assemble your selected frames into a SEQ with your selected name in the order you have set.
- Add the required "movieDir =" entry in your project's RESOURCE.CFG file by clicking the "Append RESOURCE.CFG" menu item (under "Tools") or toolbar button.
Download
Download from here:
- TBA
Source Code is available here:
- TBA