SCI Studio Tutorial Chapter 17 - Creating and Using Props
This chapter will teach you everything you need to know about props. Thinking of your game as a movie, the props are the things in the background, things the player can pick up, things the player can interact with, etc. They are generally used for anything you want to have in the background that doesn't move.
Getting Started
In the Resource Explorer, there's a list of the game's resources.
| Click on the script folder and the list of scripts in your game will appear on the right, along with a preview of the first script. |
| Scroll down the list until you read the "rm001" script. Double click on it, and the script editor will open up with the script. |
Creating Props
As SCI is object oriented, props are all members of the Prop class. To create them, you simply create a prop instance. In the instance, you will define the properties which will make up the prop, such as what view it uses, what loop, cel, priority, etc. There are a large number of properties you can set, though most of them you won't personally use, as they are used by the class.
We will begin by creating a simple prop. First, you need to create a view for the prop.
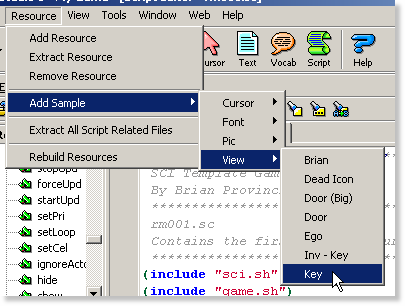
| To save time, go to the Resource Explorer and select "Resource"->"Add Sample"->"View"->"Key" from the menu. |
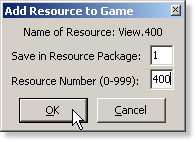
| The "Add Resource" window will pop up. Choose number 400 for the prop. You could make it any number you want, but for the purpose of keeping your game consistent with the tutorial, it's best to use the same number. |
Now the view is part of your game. We will continue by scripting it into the first room. First, go back to the script editor.
In rm001.sc, scroll down to the end of the file. There is where we'll add the prop instance.
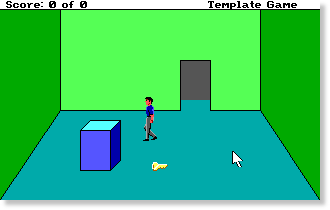
Add the following lines of code:(instance theKey of Prop (properties y 160 x 160 view 400 ) )This creates the prop with view.400 (the key) as it's view, and positions it at 160,160. Next, we will add the code to initialize it.
Go to the end of the rm001 instance's init() method.
Add the following line of code:(theKey:init())This calls the key prop's init() method setting it up and making it visible. No send it needed because we are sending directly to an instance. The same goes for classes. You only need to use the send if you are sending to an object pointed to by a variable.
|
Click the "Compile and Run" button and you will see the key is now part of your game! |
Animating Props
To animate a prop, you must set it's cycler property to a cycler class. Cycler classes allow you to set up how the animation is cycled. The following cyclers are available:
Cycle, Fwd, Walk, CT, End, Beg, Rev
For detailed information on the cyclers, take a look at the the Cycle Class section from the SCI Studio Help File.
In the case of the key prop, we will use the Fwd cycler. This will animate the prop from the beginning to end.
To set up it's cycler, you will need to add a call to the setCycle() method. Change the following line of code from:(theKey:init())To:(theKey: init() setCycle(Fwd) )
|
Click the "Compile and Run" button and you will see the key animating! |
Customizing Props Further
The Prop class contains a large number of properties which you can set to fit your prop's needs. The full list is available in the Prop Class section from the SCI Studio Help File. Below, you will learn about the main ones.
The loop And cel Properties
The loop and cel properties allow you to set the loop and cel your prop uses. If the view is animating, the cel property will indicate the first cel which is shown. If the view is static, it indicates the cel shown.
The priority Property
The priority property, or actually setPri() method, which sets it's property accordingly, indicates the priority the prop will have. By default, the property is automatically set up so that characters can walk around and behind it. To customize it, you can set it to any value from 0 to 15 or -1. A "-1" indicates that everything is drawn behind it.
To set it's priority, simply add another method call to it.(theKey: init() setCycle(Fwd) setPri(0) // an example of setting it to 0 )The cycleSpeed Property
The cycleSpeed property allows you to set how fast or slowly the prop animates. The default speed is kind of quick for the key, so change it to 1 to slow it down a bit.
The ignoreActors() Property
The ignoreActors() property, or actually method, which sets it's property accordingly, indicates whether or not actors notice it. By default, if an actor walks into it, the actor will stop because it's an object and the actor is bumping into it. Since this is a key on the ground and the actor could easily walk over it, we can change this with the ignoreActors() method. By calling it, actors can walk over it without being stopped.
To set it's priority, simply add another method call to it.(theKey: init() setCycle(Fwd) setPri(0) // an example of setting it to 0 ignoreActors() )

That concludes the basics of creating and using props. In the next chapter, you will learn how to allow the user to pick up the key and handle the inventory.
< Previous: Chapter 16 - Handling The Player's "Said" InputNext: Chapter 18 - Handling The Inventory >


