SCI Studio Tutorial Chapter 18 - Handling The Inventory
This chapter will teach you everything you need to know about setting up and using inventory items.
Setting Up The Inventory Items
To set up the inventory items, you will need to modify two files: main.sc and game.sh. The main script is where you set up the inventory item's instance, and add it to the item list. The game header is where you define it's index to a name.
Open your game. In the Game Explorer, there's a list of the game's resources.
| Click on the script folder and the list of scripts in your game will appear on the right, along with a preview of the first script. |
| Scroll down the list until you read the "main" script. Double click on it, and the script editor will open up with the script. |

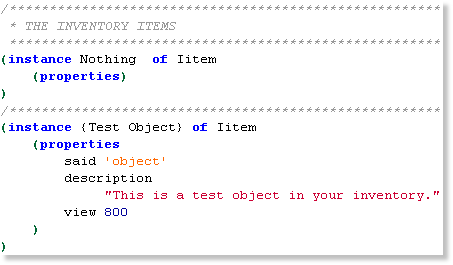
There are two inventory items here. The first, named "Nothing" is item #0. You don't need to worry about this, it's used internally by the class system. The second instance is the first item, item #1.
Inventory item #1 is named "Test Object". The curly brackets are used because it is more than one word. It has three properties: said, description and view.
- The said property specifies a phrase which, if the player enters, it will display information about the item.
- The description property is a string containing the item's description. When the player inspects the item, this text will be shown in the dialog.
- The view property indicates the view to be displayed with the description in the inventory dialog. The loop and cel properties can be used as well. If unspecified, it will display the view's loop 0/cel 0 image.
Creating The Key Inventory Item
To create they key inventory item, you can simply change the Test Object instance.
- Change the instance name from "Test Object" to "key".
- Change the said property from 'object' to 'key'.
- Change the description from "This is a test object in your inventory" to "This is a key.".
- The view can stay the same since we will add the view to the game as view.800. If the view was going to be a different number, you would change this as well.
The key inventory item's instance is now set up. Before compiling, there's one more thing you will need to do.
Adding The Item To The Inventory List
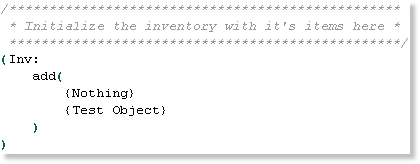
You will now need to add the key to the inventory item list. Scroll down to the bottom of the Game instance's init method until you find the following lines of code:

This is where the items are added to the inventory list. This initializes the items in the list and sets up their order. "Nothing" is item #0, "Test Object" is item #1, and so forth.
Change the item name from "Test Object" to "key".
The key is now set up in the inventory as item #1. The final step is to add a define to game.sh so that we can access the item by a label rather than a number.
| Click on the "compile" button to save the changes to your main.sc script. |
| Click on the "open" button on the toolbar. It will execute the "Open File" dialog. If you are not in your game's \src directory, go to it. Once there, open the file "game.sh". |
Once you have game.sh open, you can edit it. This is the game's header file. You can put all the defines your game needs in here.

So that you won't need to access the inventory items by they numbers, you should put defines for each of them here.
Change the line (define INV_TEST_OBJ 1) to (define INV_KEY 1).
| Click on the "save" button on the toolbar. |
You inventory item is now completely set up. The final step is to add it's custom view to the game.
|
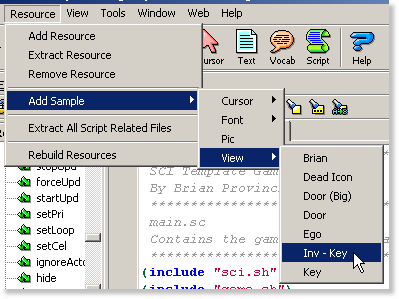
To save time, you need not draw the view. Simply go to the top menu and select "Resource"->"Add Sample"->"View"->"Inv - Key" from the menu. The "Save To Game" dialog will popup. Set the view number to 800 and click "OK". |
Now, the key is completely set up for use in your game!
Using The Inventory Item
Now that the item has been set up, we can add the code to allow the user to pick it up.
Go back to the Game Explorer.
| Click on the script folder and the list of scripts in your game will appear on the right, along with a preview of the first script. |
| Scroll down the list until you read the "rm001" script. Double click on it, and the script editor will open up with the script. |
Now that the rm001 script is open, we can get started.
Scroll down to the RoomScript instance's handleEvent() method.
We will do three things:
- Use the Said() function to check if the player typed "take key"
- Use the ego's inRect() method to check if the ego is close enough.
- If the user is close enough, add the key to the inventory.
To do this, use the following code:(if(Said('take/key')) (if(send gEgo:has(INV_KEY)) Print("You already have it!") )(else (if(send gEgo:inRect(150 150 170 170)) Print("O.K.") (send gEgo:get(INV_KEY)) (theKey:hide()) )(else Print("You're not close enough!") ) ) )First this code checks if the player entered "take key". If they did, it checks if they already have it. If they do, it print's "You already have it!". Otherwise, if checks to see if ego is in the area of (150,150) and (170,170). This area is used because the key was positioned at (160,160).
If the ego is not it the area, it prints "You're not close enough!". If the ego is in the area, it prints "O.K.", adds the key inventory item to ego's inventory, then hides the view showing on the screen.
The inventory item is almost set up now. There's just one thing left to do.
The prop theKey is initialized and drawn every time the player enters the room. Since the player could be come back to this room after picking up the key, we must make sure it is only drawn if they player doesn't have it.
| Scroll up to the bottom of rm001's init() method to find code initializing the key prop. |
Now, update this with an if statement check if the ego has the key already.
Code:(if(not (send gEgo:has(INV_KEY))) (theKey: init() setCycle(Fwd) // ... any other code you added ) )This code checks if the ego has the key in it's inventory. If it does not, it initializes and draws the key prop.
That concludes inventory items! In the next chapter, you will learn how to create and use actors!
< Previous: Chapter 17 - Creating and Using PropsNext: Chapter 19 - Creating and Using Actors >


